There are various methods for changing the background of a photo in Photoshop. The best process is to use a hand-drawn clipping path to get an accurate and perfect photo cutout. This process helps make the photo look natural and eye-catching.
Why need a background removal service? There are many reasons for changing the background of an image. Whether for e-commerce businesses, professional applications, or achieving a high-end result, it often comes with diverging the backdrop from photos of all aspects. If you are connected with the e-commerce industry, such as an online store, marketplace, advertising agency, or photography agency, you vastly need this.
Background Color Changing Guide: Transform Your Photos with Photoshop
Using Photoshop, you can effortlessly remove and change the background of any image. Whether you’re aiming for a professional look or a creative twist, this guide will help you achieve stunning results. Are you ready to learn the secrets of perfect photo editing?
How to Make a White Background in Photoshop: A Step-by-Step Guide
Step 1: Open the Image in Photoshop
First, open your image in Photoshop. You can do this in a few different ways. Drag the photo directly into the Photoshop workspace or navigate to File > Open and select the photo from your computer. This step is straightforward and sets the stage for your editing process.
Step 2: Select the Pen Tool
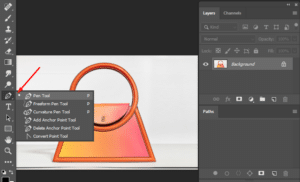
Next, select the “Pen” tool from the toolbar. This tool allows you to create a precise clipping path around the object you want to keep.
Step 3: Create a Clipping Path Around the Object
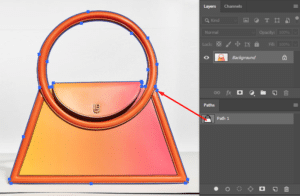
In this step, accuracy is key. Zoom in on the photo to 300% to 400% to capture all the intricate details. Use the Pen tool to start creating a clipping path around the object. Carefully trace the boundary of the object, ensuring both the outside and inside edges are included in your path. This precision will help in creating a clean and professional cutout for the next steps.
Step 4: Select the Path and Create a Cutout Layer
After completing the clipping path, select the path by pressing the “Ctrl” key and clicking on the path icon. This step is straightforward and prepares your object for the next phase.
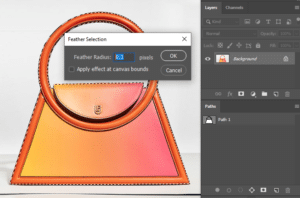
Next, go to Select > Modify > Feather and set the feather radius to 0.3 or 0.5 pixels, depending on your image’s sharpness. Feathering softens the edges of your selection, making the cutout look more natural. If your image is blurry, consider increasing the feather radius slightly to achieve a smoother edge.
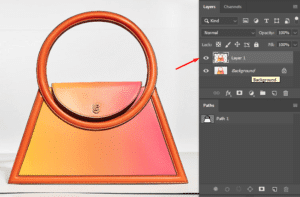
Finally, mask the layer to isolate your object. Now, your cutout image is ready, and we can move on to changing the background color.
Step 5: Add a White Background
In this stage, you’ll add a new white background to your image. Follow these steps:
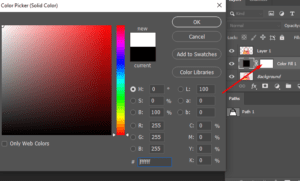
- Choose “Solid Color” from the bottom of the Layers panel.
- Your image might temporarily disappear. Don’t worry—click to reposition the layers.
- Drag the solid color layer below the cutout layer in the Layers panel.
- When prompted, select white as your color.
Now, your cutout image should be placed over a clean, white background, ready for final touches.
Step 6: Save the Photo
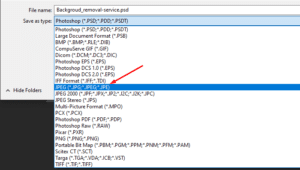
In the final step, you will learn how to save the photo. Now, your file is done. You might have to save the image. You can do so by pressing Ctr+S or the File> Save option and keeping it in JPG format.
Tips for a Professional Finish
- Adjust Lighting and Shadows: Ensure the lighting and shadows of your object match the new background for a seamless look.
- Refine Edges: Use the Refine Edge tool to smooth out any rough edges around your object.
- Layer Adjustments: Play with layer adjustments like brightness, contrast, and saturation to make your image pop.
Why Background Removal is Essential
Background removal isn’t just for aesthetics. It’s crucial for various industries, particularly e-commerce. Clean, white backgrounds help products stand out and meet the requirements of platforms like Amazon, Etsy, eBay, and Alibaba.
How Photoexpertbd Can Help
We see new trends in e-commerce platforms. The clipping path and, after that, the white background are the requirements of many e-commerce platforms. Moreover, most e-commerce platforms like Amazon, Etsy, eBay, and Alibaba recommend uploading white background product photos. Just think, a photography agency took thousands of product shots per day. It consumes time to do it. They send them to an outsourcing company for the clipping path. They take 24 hours for turnaround time. Is it possible? Yes, providing 1000 clipping paths and background removal services daily is possible.
Our Services Include:
- Hand-Drawn Clipping Path
- Background Removal
- Multi Clipping Paths
- Image Masking
- Alpha Channel
- Image Manipulation
- Invisible Ghost Mannequin Effect
- Image Retouching
- Shadow Creation
- Image Reflection
- Color Correction/Color Variants
Outsourcing your images to a professional service can save you time and ensure high-quality results, allowing you to focus on growing your business. If you’re interested in our services, feel free to contact Photoexpertbd for reliable and professional image editing solutions.
By following these steps, you can easily make a white background in Photoshop and improve the overall quality and professionalism of your images.
FAQs:
Why is background removal important in image editing?
Background removal focuses attention on the main subject, enhances professionalism, and is crucial for meeting the requirements of e-commerce platforms like Amazon and eBay.
What tools can I use in Photoshop to remove backgrounds?
You can use the Pen Tool for precise clipping paths, the Quick Selection Tool for faster selections, or Layer Masks for non-destructive editing.
How do I create a clipping path using the Pen Tool?
Select the Pen Tool and carefully trace around the object you want to isolate. Once the path is complete, convert it into a selection and mask out the background.
What is feathering, and why is it important?
Feathering softens the edges of your selection, creating a more natural transition between the subject and the background, which enhances the overall image quality.
Can I change the background to a color other than white?
Yes, by choosing a different color when adding a Solid Color fill layer, you can change the background to any color you prefer.

