Creating a natural shadow in Photoshop can be tricky, but mastering this skill is essential for adding volume, depth, and a sense of realism to your images. In this guide, we’ll walk you through the process step-by-step, ensuring you achieve professional and realistic-looking shadows that enhance your photos. For additional tips on shadow creation services and creating a white background, you can visit our related articles.
Understanding Shadows
First, let’s delve into what a shadow is. In photography and digital imagery, a shadow is a dark area where light from a light source is blocked by an opaque object. Essentially, it looks like a dark outline or shape created by your subject, projected onto a surface behind or beneath it. Properly crafted shadows can significantly enhance the realism and visual appeal of your images by providing depth and context, making them more dynamic and engaging.
How to Create a Natural Shadow in Photoshop
Creating natural shadows in Photoshop involves a series of precise steps. The most effective technique often starts with using a white background, which works well with any image. This method is particularly useful when dealing with colored objects where you want to create a shadow that appears natural and integrated with the image. Here’s a detailed, step-by-step guide on how to achieve this:
Step 1: Isolate the Object from the Background
Open your image in Photoshop. Start by isolating the subject from its original background using the Pen Tool. This allows you to create a clean and professional cutout of your object.

Step 2: Select the Path
After outlining the object with the Pen Tool, make a selection by pressing “Ctrl” and clicking the path icon. To soften the edges, go to Select > Modify > Feather and set the feather radius to 0.5 pixels.
Step 3: Duplicate the Object
Press “Ctrl+J” to duplicate the selected object onto a new layer. This layer will be used for the shadow creation process.
Step 4: Create a Transparent Background
Turn off the visibility of the original background layer by clicking the eye icon next to it in the Layers panel. You should now have your object on a transparent background.
Step 5: Add a Solid Background
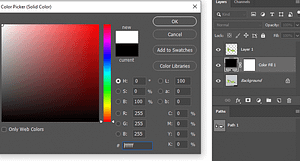
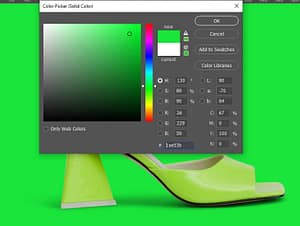
To see your shadow creation better, add a solid color background. You can do this by going to Layers > Solid Color and selecting a color for the background that contrasts with your object.
Step 6: Create a Background Copy Layer
Make a copy of the object layer by dragging it down to the “New Layer” icon in the Layers panel. This copy will be adjusted to create the shadow.
Step 7: Select the Best Channel for Shadow Creation
Go to Window > Channels and examine the Red, Green, and Blue channels. The Red channel typically provides the best contrast for shadows. Select the Red channel and copy it.
Step 8: Adjust the Shadow Contrast
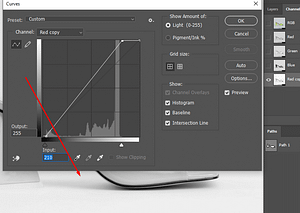
With the Red channel copied, press “Ctrl+M” to open the Curves panel. Adjust the curve to brighten the shadow areas, making them more distinguishable for a natural shadow effect.
Step 9: Cut Out the Shadow Area
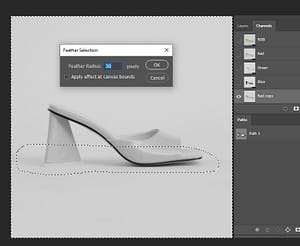
Use the Lasso Tool to select the shadow area under the object. Then go to Select > Modify > Feather and set it to 30 pixels to soften the shadow’s edges.
Step 10: Invert and Delete the Shadow Area
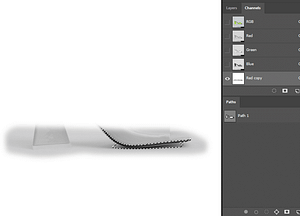
Press “Ctrl+Shift+I” to invert the selection and hit delete. This will remove the selected area, leaving only the shadow intact on the object’s transparent layer.
Step 11: Create a Blank Layer for the Shadow
Create a new blank layer and place it underneath the object layer. Set your foreground color to black, then press “Alt+Delete” to fill this blank layer with black, creating the base for your shadow.
Step 12: Blur the Shadow
To soften the shadow, go to Filter > Blur > Gaussian Blur and apply a small amount of blur. This step helps the shadow blend naturally with the background.
Step 13: Clean Up the Shadow
Use the Eraser Tool to clean up the shadow. Gently erase parts of the shadow to smooth out any harsh edges and make the shadow look more natural.
Step 14: Check the Shadow Placement
Move the shadow around and adjust its size or orientation to match the object’s light source. Ensure the shadow aligns realistically with the direction of the light.
Step 15: Experiment with Different Background Colors
Test your shadow against various background colors. You can do this by changing the solid color background (from Step 5) to different hues. This ensures your shadow looks good across different settings.
Step 16: Finalize the Shadow
After confirming that the shadow looks good, finalize the shadow by merging the shadow layer and the object layer together (right-click > Merge Layers).
Step 17: Save Your Work
Save your work in Photoshop format (PSD) for further editing. You can also save it in other formats like JPEG or PNG for different uses.
Step 18: Export Your Image
Once satisfied with your shadow effect, export the final image. Go to File > Export and choose the appropriate format for your project.
Use Luminance to Create a Shadow
For a more subtle shadow effect, you can use the luminance of the image to generate a shadow. Start by placing your object in the foreground of the scene. Add a Levels adjustment layer above the object. Then, set the output level to around -100 to darken the areas where the shadow would naturally fall. This technique creates a softer shadow that isn’t too obvious, making it ideal for natural landscapes or scenes where light is more diffused. It’s a great method for adding depth without overpowering the image.
Use Blacks to Create a Strong Shadow
For a more defined and intense shadow, add a new layer above your subject and fill it with solid black. This method works well when you need a bold shadow effect, especially for large or dark objects. You can then adjust the Opacity and Blur to soften the edges, making sure it doesn’t overpower the rest of the image. This technique is great for creating dramatic lighting effects or emphasizing the weight of an object in the scene.
Common Mistakes in Shadow Creation
What to Avoid:
- Incorrect Light Source Alignment: One of the most common mistakes is creating shadows that don’t match the light source. Shadows should fall in the opposite direction of the light and reflect the shape of the object realistically. Misalignment can make the image look unnatural.
- Harsh Shadow Edges: Shadows with hard, sharp edges often look artificial. In real life, most shadows have soft, feathered edges depending on the light’s intensity and distance. Hard edges can ruin the realistic look of the image.
- Inconsistent Shadow Opacity: Another error is applying shadows that are too dark or too light for the environment. Shadows need to match the overall lighting of the scene, so having inconsistent opacity can make the object stand out unnaturally.
- Flat Shadows: Failing to add depth to shadows is a common issue. Shadows should gradually fade as they move away from the object. Flat shadows can make the image look two-dimensional.
How to Fix Them:
- Light Source Alignment: Always determine the light source before creating the shadow. Imagine where the light is coming from and position the shadow accordingly. Adjust the angle and distance of the shadow to ensure consistency with the light direction.
- Softening Shadow Edges: Use the Feather tool to soften shadow edges or apply Gaussian Blur to smooth out harsh lines. This makes the shadow blend naturally with the background.
- Adjusting Opacity: Use the Opacity slider to tweak the transparency of the shadow layer. Observe the lighting conditions in the image and adjust accordingly to make the shadow blend better.
- Adding Depth: To avoid flat shadows, consider using Gradient tools or Layer Masks to gradually fade the shadow as it moves away from the object, mimicking natural light falloff.
For further techniques on creating realistic drop shadows, you might find these resources helpful:
- Adobe’s guide on drop shadows provides an overview of the built-in shadow effects in Photoshop.
- Path Edits’ tutorial on creating realistic drop shadows offers detailed steps for achieving natural-looking shadows.
Creating natural shadows in Photoshop can be challenging, but with the right techniques, you can add a sense of realism and depth to your images. Every photo may require a different approach, but mastering these steps will help you achieve the desired results. Whether you need subtle or strong shadows, understanding how to manipulate light and shadows in Photoshop is an invaluable skill for any photographer or designer. Happy editing!


